General StatIM Preventative Maintenance:
To ensure trouble-free performance, both the operator and the dealer must follow a preventative maintenance schedule.
NOTE: Please refer to your National, Regional, State or Safety laws for any additional reoccurring user testing that may be required.
| Operator | Preventative maintenance action | Part | |
|---|---|---|---|
Daily | Water Reservoir | 💧Replace water as needed. (Use distilled water <5ppm TDS) 💧Empty the waste bottle every time you refill the water reservoir. 💧For ophthalmic use, drain at the end of every workday, leave empty, and refill at the start of the next workday. | Water distiller VistaPure TDS Meter |
| Waste Bottle | 💧Empty the waste bottle every time you refill the water reservoir. 💧Fill the bottle with water, up to the MIN line marking. | Waste bottle and parts | |
Weekly | Cassette | 💧Wash the interior of the cassette with dishwashing soap or a mild detergent that does not contain chlorine. 💧Scrub the inside with a cleaning pad designed for use with Teflon™-coated surfaces. 💧After removing all traces of the detergent, treat interior surfaces of the cassette with the STAT-DRI™Plus drying agent to enhance the drying process. | Cassette STAT-DRI™ Plus |
| Biological and/or Air Filter | 🔎Check the filter for dirt and moisture. 🔁Replace if dirty. ⚠️Call for service if wet.💧 | Biological Filter Air Filter | |
| Water Filter | 🔎 Check the water reservoir filter every week and clean if necessary. Replace only if necessary. | Reservoir filter | |
Every 6 months | Cassette Seal | 🔁Replace every 500 cycles or six months (whichever is first), or whenever necessary. 🔎Video: How to change the cassette seal | Cassette seal |
| Biological and/or Air Filter | 🔁 Replace every 500 cycles or six months (whichever is first). | Maintenance Kit: Cassette seal and both air filters |
| Technician | Once a year | Part |
|---|---|---|
| Cassette | 🔎Check the tray, lid and seal for damage. Replace if necessary. | |
| Biological Filter | 🔎Inspect the biological filter for moisture. | |
| Solenoid Valve | 🔎Inspect the valve and clean if dirty. Replace the plunger if defective. | |
| Pump | 🔎Replace in-line water filter. | |
| Check Valve | 🔎Remove the exhaust tube from the back of the unit during the air drying phase. 🔎Check for air coming from the fitting. 🔎Remove the air compressor tube from the check valve inlet while running a cycle. Make sure no steam is leaking from the valve. Replace if there are any leaks | |
| Water Reservoir | 🔎Check the reservoir for dirt. Clean and rinse with steam process distilled water if necessary. | |
| Calibration | 🔎Calibrate the unit. |
More information about preventative maintenance subscriptions
Here is the free poster and links to individual parts to keep on hand to keep things working smoothly:
- Quick Reference Poster Maintenance STATIM 2000 & 5000
- Maintenance Kit: STATIM 2000 Cassette seal and both air filters
- STATIM 2000 Cassette Seals
- Air compressor filter [foam donut] for STATIM 2000
- Biological Air compressor filter [external clear plastic] for STATIM 2000, 5000 & 7000
- Solenoid Plunger Repair Kit
- Check valve replacement kit 2000
- 15A Fuses for STATIM 2000 PC Board
- Waste Bottle Fitting STATIM
- Water Filter In-Line Kit
- Water Reservoir filter
- STATDRI Plus Drying / Rinse Agent
Consider also a second sterilization cassette: STATIM 2000 Sterilization Cassette [parts available separately]
Also, to protect the cover of your Statim: STATMAT protective cover for STATIM 2000 + G4
More details:

Water Reservoir
Replace water as needed with pure distilled water (Less than 5 parts per million of Total Dissolved Solids)
For ophthalmic use, drain at the end of every workday, leave empty, and refill at the start of the next workday.

🔎Statim reservoir view of exit hole, float and water quality sensor

Waste Bottle
Empty the waste bottle every time you refill the water reservoir.
Fill the bottle with water, up to the MIN line marking.
Get a new waste bottle or parts, such as tubing or the top fixture.

Cassette
Wash the interior of the cassette with dishwashing soap or a mild detergent that does not contain chlorine.
Scrub the inside with a cleaning pad designed for use with Teflon®-coated surfaces.

STAT-DRI Plus dramatically shortens drying time in your autoclave!
STAT-DRI Plus refills can be ordered in our shop

STATIM Water Reservoir Filter and Cap Kit
Check the water reservoir filter every week and clean if necessary.
Replace Filter only if necessary.
IMPORTANT UPGRADE: Get a new cap and water filter kit if your STATIM does not have one.
Replacing the water reservoir filter: read full article

Biological Filter
Air and Biological Air Filters for STATIM 2000 (compressor shown open)
Replace both air filters every 500 cycles or six months (whichever is first).
Get a new biological filter. Older units will not have the biological air filter.
⚠️ Call for service if wet. The check valve will need to be replaced.

⚠️This biological filter is wet.
The check valve must be replaced

Air Filter
Replace both your STATIM air filters every six months or else it will look like the dirty yellow one top left!
(STATIM 2000 air compressor filter shown)
Replace every 500 cycles or six months (whichever is first). Get a new air filter.

STATIM Cassette Seal & Lube Kits
[Seals go green! Read full article]
Replace every 500 cycles or six months (whichever is first), or whenever necessary. Get a new cassette seal.

If you need further assistance, a STATIM user’s manual, Reference Poster, or a Troubleshooting Guide, please contact us
Brian Skellie and our team will help!

LCD NextGen Module Statim 2000/SG4
LCD NextGen Module Statim 2000 G4
Color LCD Screen for Statim 2000 G4 autoclaves
- Cracked?
- Not working?
- Pinched cable?
Replace it!
This is quickly attached with screws and adhesive backing. Includes decal for cover.
More details: Technical Service Bulletin 21-TSB-412
Description:
LCD touchscreen for old generation STATIM® G4 now available.
Models and Markets: All STATIM® G4 units; worldwide.
Summary:
A replacement LCD touchscreen is now available again to repair STATIM G4 units with old generation LCD controller boards.
Responding to the demand for a reasonable alternative to a complete cover replacement, Coltene SciCan has managed to secure a new supply of LCD touchscreen that are compatible with the existing old generation LCD controller boards.
This will reduce the cost of repairing units with old generation LCD controller boards needing only an LCD touchscreen replacement.
For LCD touchscreens compatible with old generation LCD controller boards, use the following part numbers:
- 01-112399S LCD module for Statim 2000S/G4
- 01-113641S LCD module for Statim 5000S/G4
The following are addressed in this Technical Service Bulletin:
- Why this is important.
- Identifying whether it is an Old Generation or Next Generation LCD controller board.
- Troubleshooting LCD touchscreen problems.
- LCD touchscreen replacement information and part numbers.
1. Why this is important.
Prior to this, if you were repairing an old generation LCD board that required an LCD touchscreen replacement, you could not use the new generation LCD touchscreen. Instead, you had to replace the LCD board, LCD module and cover as one complete assembly.
2. Identifying whether it is an Old Generation or Next Generation LCD controller board.
- If the unit is functioning, press Settings to view the unit’s software information. (Figure 1)
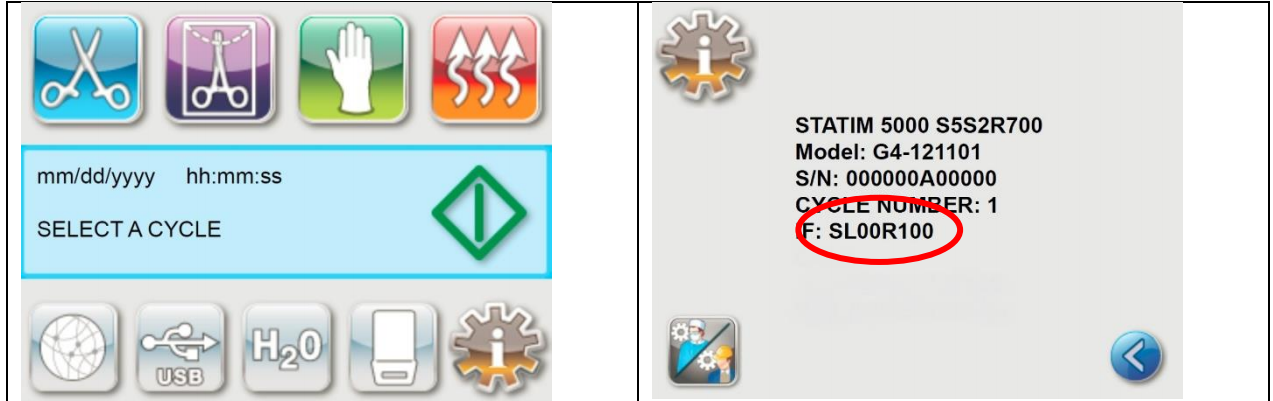
Fig. 1
Units with ‘00’ series software (SL00R1XX) are using old generation controller boards. Only the old generation LCD touchscreen is compatible with this board (01-112399S LCD module Statim 2000S/G4 or 01-113641S LCD module Statim 5000S/G4).
Units with ‘01’ series software (SL01R128 and up) are using new generation boards. Only the new generation LCD touchscreen is compatible with this board (01-115317S LCD NextGen Module Statim 2000/S G4 or 01-115318S LCD NextGen Module Statim 5000/S G4).
- If the unit is NOT functioning, you will have to remove the cover and fascia and read the information that is printed on the LCD controller board as shown in Figure 2.
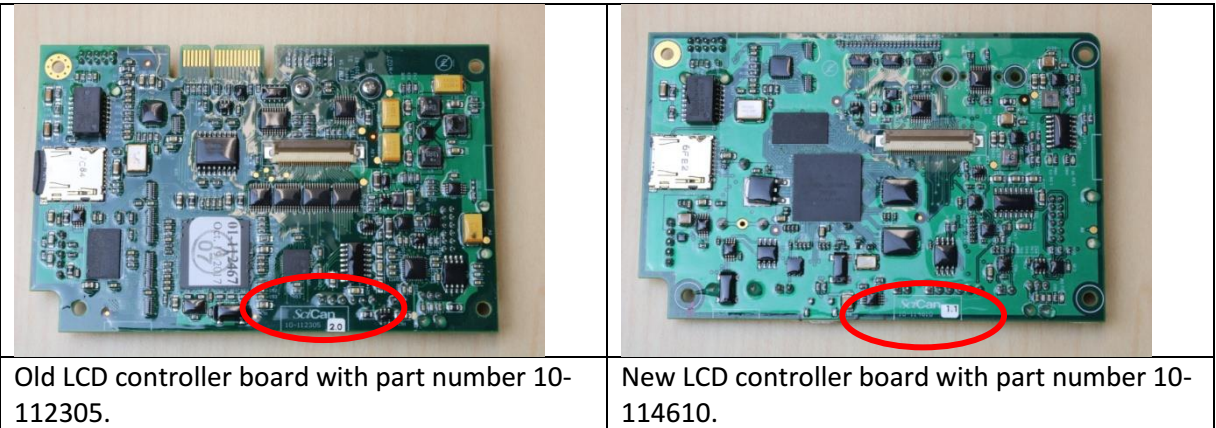
| Old LCD controller board with part number 10-112305. |
New LCD controller board with part number 10-114610. |
Fig. 2
- Units with an LCD controller board part number 10-112305 are compatible with the old generation LCD touchscreen (01-112399S LCD module Statim 2000S/G4 or 01-113641S LCD module Statim 5000S/G4).
- Units with an LCD controller board part number 10-114610 are compatible with the new generation LCD touchscreen (01-115317S LCD NextGen Module Statim 2000/S G4 or 01-115318S LCD NextGen Module Statim 5000/S G4).
3. Troubleshooting LCD touchscreen problems
Not all touchscreen problems require an LCD touchscreen replacement. Some can be resolved with software updates and contact cleaning.
The following troubleshooting steps assume that you are a qualified technician and familiar with the following:
- Removing a STATIM G4 cover.
- Updating software on a STATIM G4
- Identifying software versions SL00RXXX or SL01RXXX o Removing components in the STATIM fascia
- Backing up the Scilog folder
- Performing a Windows error check
Problem: The LCD screen is white
Possible cause: There is a software issue. The MicroSD card is corrupted.
- Start by removing the MicroSD card from logic board.
- Insert the MicroSD card into your computer’s MicroSD card reader and perform a Windows error check. When the check is complete, allow Windows to repair the card.
- Reinsert the MicroSD card into the logic board.
- Load a USB memory stick with the latest LCD software for the STATIM you are repairing and perform an LCD software upgrade.
Problem: The LCD screen is black
Possible causes: No power. LCD backlight is damaged.
- Check the power supply at the outlet.
- Check that the power cable is properly connected.
- Check the 5V DC coming from the power adapter.
- Use electronics spray to clean the contacts on the 5V power adapter and on the LCD.
- Check LCD for cracks.
- Use a tester LCD to determine if this will solve the problem.
Problem: The screen is unresponsive and stuck on the SciCan logo
Possible cause: Bad contact on the MicroSD card port located on the logic board.
- Remove the MicroSD card and clean both the MicroSD card and the port on the logic board using electronics spray (contact cleaner).
Problem: Flickering or yellow screen or different color on the screen
Possible cause: LCD touchscreen damaged.
- Check for any cracks on the LCD.
- Check the cycle records for any Cycle Fault caused by a major leak such as a CF3.
- Check and clean the contacts.
- Use a tester LCD to determine if this will solve the problem.
Problem: The LCD is getting stuck on some screens but works after restart.
Possible cause: MicroSD card is corrupted.
- Start by removing the MicroSD card from logic board.
- Insert the MicroSD card into your computer’s MicroSD card reader and perform an error check. If an error is found, replace the MicroSD card.
Problem: The LCD screen is not responding correctly.
Possible causes: Software issues. Screen damaged.
- Check the LCD software version – the SL number.
- If SL00Rxxx where xxx is a revision that is lower than R129, perform a software upgrade.
- Look for any cracks on the screen, which can be caused by a hard press on the LCD screen. If you see a crack, replace the LCD touchscreen.
4. LCD touchscreen replacement information and part numbers
For instructions on how to replace an LCD touchscreen module, see the service manuals for both STATIM 2000 G4 and STATIM 5000 G4, Section 6. Cover Assembly Removing and replacing the LCD touchscreen.
For LCD touchscreens compatible with old generation LCD controller boards, use the following part numbers:
- 01-112399S LCD module for Statim 2000S/G4
- 01-113641S LCD module for Statim 5000S/G4