

We are proud to announce the launch of SciCan OPTIM OS1 Liquid to round out our new line of OPTIM OS1 broad-spectrum, hospital-grade cleaner-disinfectant products.
OPTIM OS1 is a one-step, cleaner-disinfectant that removes soil and hard-to-kill organisms from clinical contact surfaces. It’s proprietary LAS Active System formulation kills bacteria, viruses, TB bacteria, and emerging pathogens in just 1 minute.
Rapid contact times for best results
- 60-second kill times for viruses, bacteria, and yeast
- Kills TB Bacteria in only 45 seconds and Candida auris in 60 seconds
Safe for use on hard, non-porous clinical surfaces
- Cleans and disinfects stainless steel, anodized aluminum, non-porous upholstery, Corian countertops, silicone, and more
Formulated with the user in mind
- VOC-free, fragrance-free and dye-free
Emerging Pathogen Claim ensures your clinic is ready for the next viral
threat
- Qualifies for EPA’s Emerging Viral Pathogen Claim
- Kills SARS-CoV-2, the virus that causes COVID-19, in only 30 seconds
You can learn more about OPTIM’s newest formula below

OPTIM OS1 Wipes Quick Reference Guide
Consult the product label before using this surface disinfectant.
OPTIM OS1 SOLUTION Liquid Spray

Spray Ready-to-Use OPTIM OS1 liquid onto a SciCan Dry Towelette. Do not directly spray onto the surface.

If surface is not heavily soiled, clean and disinfect surface with one wipe and allow surface to remain wet for the contact time indicated on the label.

If surface is visibly soiled, clean surface with one
towelette and discard. Use a second towelette to disinfect and allow surface to remain wet for the contact time indicated on the label.
OPTIM OS1 Ready-to-Use Wipes

Pull out OPTIM OS1 towelette at a 45 degree angle. Close lid.
If surface is not heavily soiled, clean and disinfect surface with one wipe and allow surface to remain wet for the contact time indicated on the label.
If surface is visibly soiled, clean surface with one towelette and discard. Use a second towelette to disinfect and allow surface to remain wet for the contact time indicated on the label.
IMPORTANT !
DO NOT allow OPTIM OS1 to pool on surfaces.
Use of gauze dipped in solutions for wiping may cause pooling and should be wiped dry.
FOR BEST RESULTS:
- Do not over apply OPTIM OS1
- Use of OPTIM OS1 on brass, copper, and clear acrylic could discolor or damage surfaces, if not used as directed and over applied.
- Dental Association guidelines recommend the use of utility gloves when cleaning and disinfecting surfaces.
PLEASE REFER TO THE ORIGINAL CONTAINER FOR COMPLETE DIRECTIONS AND ADDITIONAL INFORMATION.
Procedure for disinfecting PVS elastomeric impression materials with OPTIM OS1
- Once the impression is taken, rinse it well under running tap water to remove blood and saliva.
- After rinsing, gently shake the impression within the sink basin to remove any adherent water with minimal splatter.
- Spray the entire impression with OPTIM OS1. Use the contact times as stated on the label.
- Rinse the impression thoroughly with tap water to remove any excess disinfectant. After a thorough rinse, gently
shake the impression inside the sink basin to remove any adherent water with minimal splatter. - Once dry, place the disinfected impression in a sealed bag.
The impression is now safe and ready for further processing.

Switching to OPTIM OS1
- Give all surfaces a good cleaning with soap and water before switching to OPTIM OS1.
- After switching to OPTIM OS1, surfaces should to be periodically rinsed with water (recommended no less than once per week).
- Common practice for all chemical disinfectants is to periodically rinse and dry surfaces to maintain the surface integrity.
- Avoid mixing of chemistries.


Water pump. For STATIM 5000 units, 120V.
Water Pumps
Identifying Pump Types
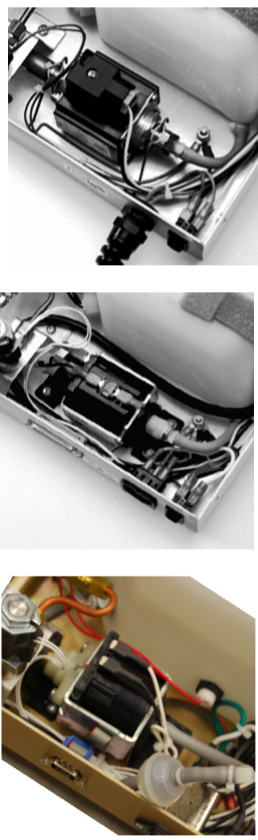
Fluid-O-Tech Pump
The Fluid-O-Tech pump is generally factory fitted to older units with revision 3.x/4/x controller boards up to approximately 1994-1995. It is a small rectangular pump with a diode plug attached to the top. The pump rests on a vibration-damping pad on the bottom of the chassis and is held in place with a wire bracket. The pump is secured to the bracket by a cable tie at each end. The black lead is attached to controller board J1-5 (LINE) and the white lead is attached to controller board J1-6 (NEUTRAL).SciCan Pump
The SciCan pump is generally factory fitted to units with revision 2.x/5.x/6.x and some early 7.x controller boards from 1995 up to mid 2008. It has a similar footprint to the Fluid-O-Tech pump, however the diode is now integrated into the pump. The pump is mounted on two vibration damping rubber brackets. Each bracket is secured to the chassis with two screws. The black lead is attached to controller board J1-5 (LINE) and the white lead is attached to controller board J1-6 (NEUTRAL).Ulka Pump
The Ulka pump is factory fitted to units with revision 7.x controller boards only from mid 2008 onwards. It is slightly smaller than the SciCan pump and can be identified by the configuration of the wires on top of the pump. The two visible connections are located adjacent and parallel to each other whereas the two visible connections on the SciCan pump are opposing each other and have a thermal switch connecting them. The pump is mounted on two vibration damping rubber brackets. Each bracket is secured to the chassis with two screws. The black lead is attached to controller board J1-5 (LINE) and the white lead is attached to controller board J1-6 (NEUTRAL).Note: Important information on pump interchangeability:
- The Fluid-O-Tech pump is no longer available, but units with this pump can be retrofitted with the SciCan pump ONLY.
- The SciCan pump and Ulka pump are NOT interchangeable. They are both still available. If replacing the pump during maintenance or servicing, the same pump must be fitted to ensure the unit works correctly.